
Event Planning Process Step by Step Guide
Anyone who has stood backstage five minutes before doors open, watching a vendor’s van crawl through traffic while the sound check is still half done, learns one thing quickly. Good events don’t happen by luck. They look effortless to guests only because someone followed a plan long before the first chair was set out.
That plan has a name: the event planning process. At Event University, we see it with every batch of students. Talent helps, but what separates a hobbyist from a professional is knowing the process of event management well enough to follow it when things get messy. This guide breaks it into seven stages, tells you what to do in each, and points out the mistakes that catch most beginners out.
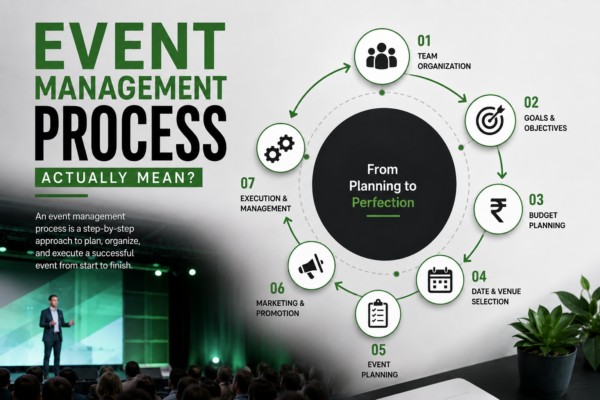
What is the event management process?
It’s the order in which decisions get made and work gets done, from a rough idea to a live event. Plenty of people worry that a fixed order kills creativity. Usually it frees it up. Once the logistics are settled early, you have time to think about the guest experience instead of hunting for an extension board ten minutes before the chief guest walks in.
Step 1: Start with a clear purpose
Before you look at a single venue, write down why the event exists. Brand visibility, lead generation, fundraising, a team celebration? Each needs a different guest list, budget and format. Then attach numbers: 300 registrations, 40 qualified leads, ₹5 lakh raised. “Make it memorable” can’t be measured, so nobody knows afterwards whether it worked. People rush this step, and everything else depends on it.
Step 2: Build your team
Nobody can watch fifteen moving parts on the day, so split the work. One person on logistics, one on vendors, one on guest experience, one on marketing. A WhatsApp group for quick updates and a short weekly call for decisions is enough for most teams. Name one person who makes the final call when two people disagree. This is why our courses at Event University are built around live projects. You can’t learn to run a team under pressure from a textbook.
Step 3: Set a realistic budget
Write out everything you can think of: venue, food, decor, sound and lights, staff, printing, marketing, permits. And then add the ones that nobody really remembers, like vendor advances, generator fuel, last minute rentals. Get written quotes from vendors so that everyone is working from the same number. Leave 10 to 15 percent as a cushion. Keep everything in one shared sheet and update it whenever money moves so a doubled decor bill shows up in week two and not on event day.
Step 4: Lock in the date and venue
First choose the date and find out if it clashes with any exams, festivals, public holidays or big cricket matches.Then find a venue that fits your guest count, format and budget. Visit in person if you can, and look at parking, power backup, entry points and washrooms. Ask exactly what the rental includes, because tables, chairs and generators are often extra. A beautiful venue two hours outside the city rarely fills up. Get the contract in writing, including what happens if you have to cancel.
Step 5: Plan every detail
This is where you’ll spend most of your hours at work. Develop a run of show that details each activity by the minute, brief each vendor and confirm AV, internet and power. There’s an owner for every cue, and a backup. Have a plan B for the usual suspects: rain, power cuts, a speaker who cancels. A rough rehearsal, even just a walkthrough with the host and tech team, catches problems no checklist will. Add in some buffer time, something always runs ten minutes late. While you’re at it, check permits like fire clearance or music licences.
Step 6: Market and promote the event
Start promotion weeks ahead, not the night before. Go where your audience already is: LinkedIn and email for corporate crowds, Instagram for college events, WhatsApp groups for quick invites. Ask speakers and partners to share the poster too, as their audience is often bigger than yours. Send small reminders as the date approaches and watch registrations as your seating and catering numbers depend on them. Even a well-organized event in an empty hall is a failure.
Step 7: Run the event
Event day is when the plan gets tested. Arrive early, walk the whole venue and brief staff and volunteers before guests come in. Carry a small emergency kit with spare cables, tape, printouts and chargers. The best managers aren’t the ones who never hit problems. They sorted most of them earlier and can handle the rest without panic.
The step most guides forget: after the event
Send Thank You messages, clear vendor payments and reconcile budget. Do a quick survey to get feedback and sit down with the team for a real debrief. Then compare your results with the goals you set in Step 1, and write down what you would do differently next time. Give them a short report with real numbers, and clients will often rebook you.
A simple event planning workflow you can copy
Every event planning workflow looks a little different, but a mid-sized event usually follows this rhythm:
- 3 months out: goals, team, budget, venue
- 2 months out: vendors, permits, programme, promotion starts
- 1 month out: registrations open, run-of-show ready, rehearsal planned
- 1 week out: final guest count, vendor confirmations, staff briefing
- Event day and after: execution, feedback, report
Shrink the timeline for smaller events, but keep the order. Skipping a stage usually costs you later.
Mistakes that quietly ruin events
The same few come up again and again. Planners skip the goal and then can’t say what the event achieved. They budget for the obvious costs and forget the small ones. They rely on a single vendor for something critical, like sound, with no backup. They start promotion too late. And they treat event day as the finish line, so no feedback is collected and the same errors repeat at the next event. Most of these disappear if you follow the steps in order, even the boring ones.
Tools that make the job easier
You don’t need expensive software to begin. A shared Google Sheet handles the budget, Google Calendar keeps deadlines visible, Canva sorts out posters and invites, and Google Forms works fine for registrations.Once you get over a few hundred guests, ticketing and check-in apps save hours at the entry gate so it’s worth paying for them then. Just remember the tool is following the plan, not the other way around. No app will fix that if you don’t have the steps above clear in your head.
Conclusion
Anyone can throw a party once. Building a career on events that hit their goals every time means learning the event management process well enough to adapt it to weddings, conferences, exhibitions or festivals. Use this event planning process step-by-step manual as a checklist for your next event, big or small. And if you can, try to do it on real projects early on because that’s when it really starts to sink in.